

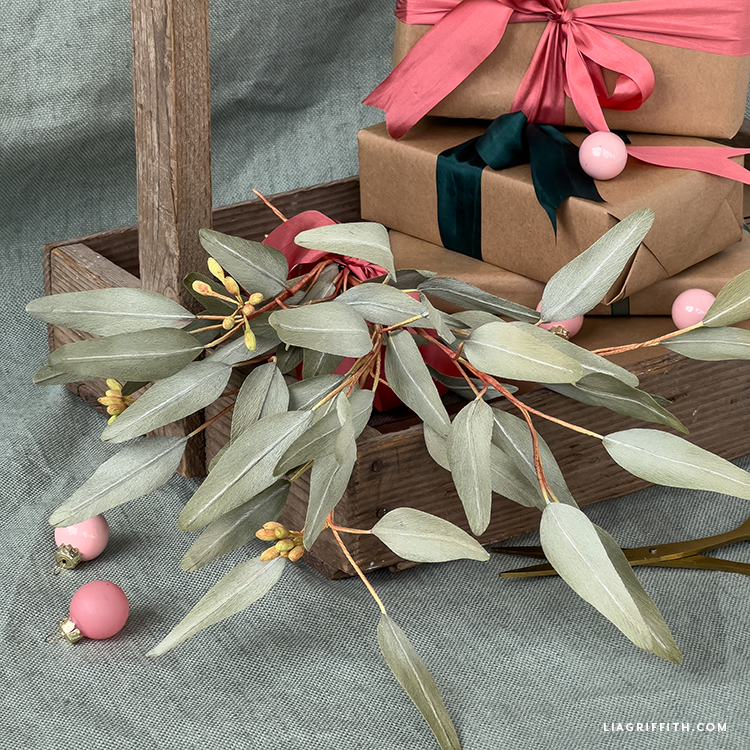
Seeded Serenity
Winter is coming, and as the cold creeps in, there’s nothing quite like the cozy warmth of home to make us feel truly at peace. If you're looking to brighten your space and lend some elegance to your holiday decor, then you'll love this next project. These lovely Crepe Paper Seeded Eucalyptus stems are perfect for creating that inviting atmosphere we all cherish during this season of togetherness.
Project Includes
Tutorial and TemplatesMaterials
- Lia Griffith Double-Sided Crepe Paper - Fern & Moss
- Lia Griffith Extra-Fine Crepe Paper – Fern
- Floral Wire – 24-Gauge Paper Covered Green
- PanPastel® Artist Pastel – Chromium Oxide Green Tint 660.8, and Permanent Red Shade 340.3
- Colored Pencils – White
- Bearly Art Precision Craft Glue - 2oz
Goodies You Can't Google
You've found a premium project. But for less than the price of a fancy coffee... You'll get instant access to this and over 2,000 other premium projects inside the Lia Griffith membership!
Become a Member

Eucalyptus has long been cherished for its soothing scent and natural beauty. However, beyond its aromatic properties, eucalyptus carries deep symbolism. Traditionally, it represents healing and protection, making it particularly meaningful during winter when we often seek comfort and care. So, as we gather with loved ones, the graceful presence of eucalyptus serves as a reminder of the bonds we share and the nurturing warmth of home.
Creating your own Crepe Paper Seeded Eucalyptus is a satisfying foray into paper botanicals and we know you’ll love how these turn out! Though we consider this an intermediate project, we highly recommend a cutting machine to help speed things along. Just count all those little leaves as a labor of love – totally worth the effort in the end.
Once your pieces are cut, use floral wire to create long, elegant stems that mimic the grace of real eucalyptus. Next, secure each leaf with craft glue, and lastly don’t forget to sprinkle in some extra-fine crepe paper for those charming seeded details. After all, it's these little touches that infuse your creation with a sense of authenticity and warmth.
As you admire your beautiful creation, think about how you want to showcase your Crepe Paper Seeded Eucalyptus. Will it grace your dining table as a stunning centerpiece or elevate your favorite vase? No matter where it lands, your handmade stems will bring warmth, charm, and a sprinkle of nature’s beauty to your home this holiday season.
So, gather your materials, set aside some “me-time,” and let your creativity flow. We’d love to see how you style your Crepe Paper Seeded Eucalyptus in our crafters’ community or with #MadeWithLia on Instagram.
Paper Flower Garden Master Class
Learn the techniques, shaping secrets, and artistry behind Lia’s most-loved flowers in this immersive master class experience. From delicate petals to lifelike movement, you’ll create stunning blooms step-by-step alongside Lia. Free for Annual and Craft Circle members.


All the Goodies You Can't Google 🎁
Tired of scrolling endlessly for the perfect project? Save time, money, and Google-induced headaches with us! Our membership makes it easy to create beautifully finished crafts without needing to look all over the internet for ideas and materials or spend lots of money on individual videos and templates.
Become a Member
Discussion
Ask Lia or the community!
8 Comments
-

Ann
November 9, 2024 at 11:49am
-

Lia
November 12, 2024 at 9:45am
@Ann
-

Ann
November 13, 2024 at 7:13pm
@Lia
-

Lia
November 18, 2024 at 9:17am
@Ann
-

Shaun
November 4, 2024 at 1:43pm
-

Lia
November 4, 2024 at 2:46pm
@Shaun
-

Kelly
November 2, 2024 at 9:38am
-

Lia
November 2, 2024 at 11:02am
@Kelly
Back to the TopThe materials call for Hansa Yellow Shade PanPastel. But, I don’t see it used in either the short video or on the picture directions. Thank you for your clarification.
Hi Ann you do not need the hansa yellow. I had intentions of using it to blend the red a bit but decided it was not needed!
Ok, thank you. I ended up using it a little on the top of the seeds to mute some of the red I got too far up. It worked well for that too.
Well, there you go! Genius!
Would it be possible to get more instruction on how to roll the little seeds. I don’t know why, but I’m not understanding this at all. Thanks
I’ll do my best! You will want to apply glue all over one side of the crepe paper, then begin rolling it over itself starting at the smaller end. Once you have rolled the entire length you will want to twist/roll the thinner bit of crepe that is at the base of the bulk of the rolled crepe…this will create the sort of stem of the seed. Now on top of the seed you will want to smooth out the roll to do this apply a bit more glue to the top of the rolled crepe, then pinch it together and press towards the center top of the seed. The glue should make the crepe paper malleable and able to be shaped, do your best to smooth out the top of the seed while the glue is tacky.
I am sooo excited about this one! Absolutely beautiful and realistic looking!
We need to make a video!! 🙂